Tired of Missed Defects? Try Thermography NDT
Get a Complete IR NDT System for In-House Use
- No Outsourcing
No Missed Defects
Just Fast, Reliable Inspections

Trusted by Engineers at Top Companies


Tired of Delays and Missed Defects?
Outsourcing inspections can cause delays, increase costs, and reduce your control over quality. Traditional NDT methods often miss hidden flaws, especially in complex materials. Engineers need a faster, more reliable way to ensure material integrity.
Get an In-House IR NDT System Now
Bringing inspections in-house gives you control over quality and timelines. Our thermography NDT system helps you catch hidden defects faster than any other NDT method. You’ll reduce delays, cut costs, and keep your projects moving. It’s the smarter way to stay ahead and stay in control.
Active Thermography NDT Methods
Explore Our System’s Capabilities


Excitation Methods We Support
- Halogen Lamp
- Flash
- Vibro / Ultrasound
- Electrical / Voltage & Current
- Eddy Current / Induction
- Laser
- Honeycomb structures (composite sandwich panels)
- Carbon Fiber Reinforced Polymer (CFRP)
- Metals
- Ceramics
- Plastics and polymers
- Bonded assemblies (adhesives and joints)
- Coatings and paints
- Solar cells and photovoltaic materials
- Electronic components (circuit boards/PCBs)
- Weld inspection
- Material thickness measurement
- Porosity inspection
Why Engineers Trust Infrared NDT
See What Other Methods Miss
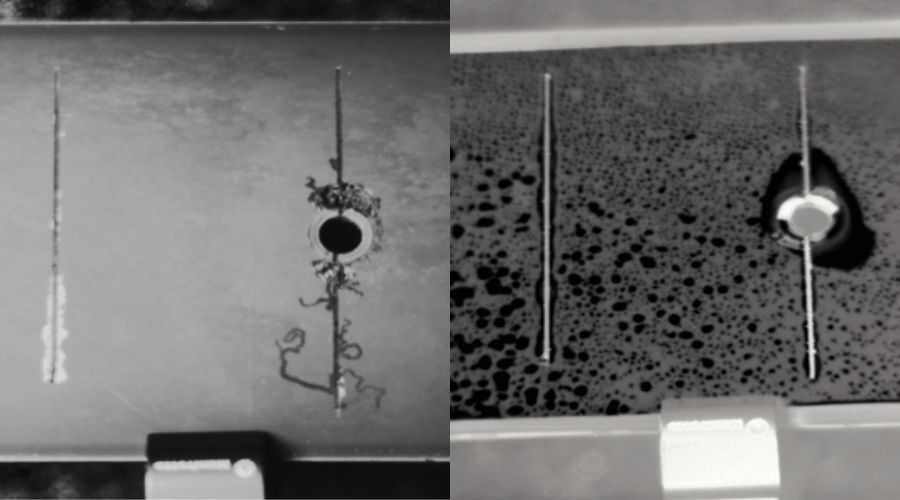
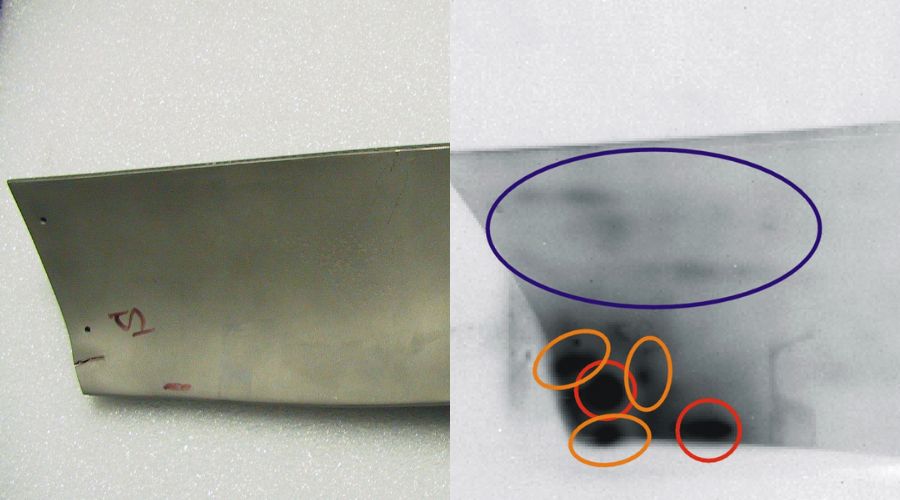
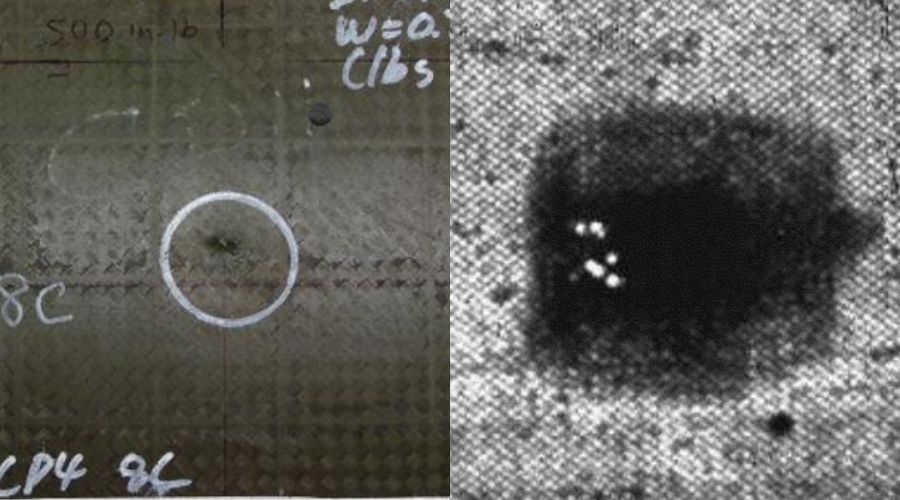
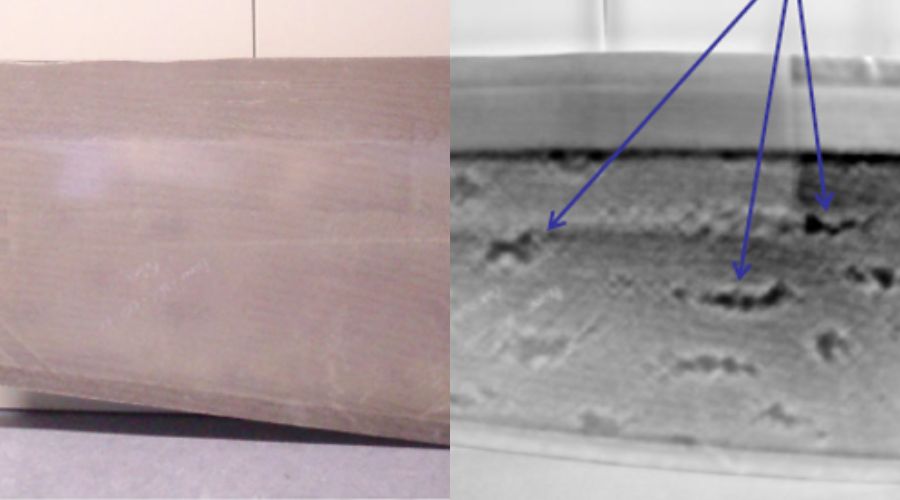
Detect internal defects like delaminations, disbonds, and voids.
Inspection Without Bottlenecks
Inspect large or complex parts up to 10x faster than ultrasound.
Visual Confidence
Thermal images provide clear proof of defects.
Works on Any Shape or Size
Works on curved, layered, or irregular composite parts with ease.
Easy Integration
Seamlessly integrates with manual and automated workflows.
Traceable, Documented Results
Export inspection images for QA reports and compliance workflows.
The IR NDT System That Engineers Trust
See What Other Methods Miss
Detects internal flaws often missed by other NDT techniques.
Rapid Scans
Inspects large parts in seconds, up to 10x faster than ultrasound.
Visual Confidence
Thermal images provide clear proof of defects.
Works on Any Shape or Size
Works on curved, layered, or irregular parts with ease.
Easy Integration
Seamlessly integrates with manual and automated workflows.
Traceable, Documented Results
Export inspection images for QA reports and compliance workflows.
Engineers switch to Infrared NDT because it eliminates bottlenecks and simplifies inspections.
Join the Pros Who Trust Infrared NDT
“MoviTHERM’s NDT System has enabled me to inspect my composite structures much faster compared to my ultrasound method. My aircraft parts have many part lines, which were time consuming to inspect before. I was able to improve my inspection time by a factor of 8 to 10 times!”

Don Norton
NDT Professional at Quatro Composites
How to Get Started
1
Book a Call to Explore Your Needs
Discover how you can take control of your inspections with IR NDT. We’ll discuss your goals and make sure the system fits your needs.
*Optional NDA available
2
Test a Sample to Validate Results
We’ll run a test on your actual part to show you exactly how the system performs, so you know it works for you.
*Small fee covers testing and reporting
3
Get Your Ready-to-Use System
We build your system to your needs, ship it fully configured, and provide training, so you can start inspecting with confidence, right out of the box.
Trusted Across Key Industries
Aerospace & Defense
Detects hidden defects in composite materials and critical parts, helping aerospace engineers deliver safety and performance.
Battery Manufacturing
Identifies micro-defects in battery cells, reducing the risk of costly failures and ensuring quality control.
Renewable Energy
Detects hidden flaws in composite structures used in wind and solar systems, helping ensure long-term performance.
Automotive
Detects flaws in composite panels, structural parts, and electronic components for fast, reliable production.
Frequently Asked Questions
IR NDT is a fast, non-contact inspection technique that uses thermal imaging to detect hidden flaws in materials. By applying controlled heat and monitoring the thermal response with an infrared camera, it reveals defects below the surface, without damaging the part.
Our systems can identify:
- Delaminations
- Cracks
- Disbonds
- Inclusions
- Voids
- Corrosion under paint or insulation (CUI)
- Impact damage
- Water intrusion and moisture
- Manufacturing defects
If you have a unique concern, reach out. Chances are, we’ve seen it before!
- Carbon fiber (CFRP) and composite laminates
- Aluminum and steel (metals)
- Plastics and honeycomb structures
- Painted, coated, or insulated surfaces
IR NDT is trusted for:
- Detecting corrosion under paint or insulation (CUI) in pipelines and tanks
- Locating water intrusion in composites, foams, and building materials
- Inspecting aircraft structures for delamination and impact damage
- Quality assurance in automotive, marine, energy, and manufacturing
- Verifying welds, adhesive bonds, or repairs
- Evaluating art, restoration projects, and historic structures
- Faster: Inspections take seconds to minutes—up to 10× faster than ultrasound
- Non-contact: No need for gels or couplants, works on sensitive surfaces
- Safer: No ionizing radiation, easy operator training
- Versatile: Excels at complex shapes and large areas, ideal for both lab and production
We offer multiple inspection techniques, chosen for your application:
- Flash (Pulse) Thermography: A rapid, high-intensity burst of energy reveals surface/subsurface flaws over large areas
- Lock-In Thermography: Periodic heating for deeper flaw detection and material characterization
- Transient Thermography: Analyzes heat flow through parts for complex inspections
- Vibro Thermography: Ultrasound-induced friction heats flaws, highlighting cracks and delaminations
- Eddy Current / Induction Thermography: Targeted heating for conductive materials and advanced defect detection
Our experts will recommend the best approach for your inspection goals.
Our systems are compatible with:
- Flash lamps and halogen lamps
- Vibro/ultrasound sources
- Eddy current/induction heating
- Electrical heating elements
- Lasers
The heat source is matched to your material and inspection depth for optimal results.
Detection depth depends on the material, defect type, and method:
- Flash Thermography: typically up to a few millimeters in metals, deeper in composites
- Lock-In or advanced techniques: can achieve greater depths for some applications
Contact us to discuss your specific part and requirements.
Sensitivity varies with the method, material, and camera used. Our cooled cameras can detect subtle temperature differences and fine cracks. We’ll assess your part to determine realistic detection limits.
Yes. Our software provides measurement tools for defect depth, area, and thermal properties. Results are easily exported (images, CSV, reports) for documentation and quality assurance.
Absolutely. We support:
- Standalone lab and QA inspections
- Integration into production lines, including motion and automation
- Robotic arm mounting for full automation
- Data export to databases, MES, or QA software
We offer custom automation and integration services as needed.
Yes. Our methods and equipment can be tailored to comply with industry standards (ASNT, ASTM, and customer-specific NDT requirements).
Yes! We provide:
- Live online demonstrations
- Remote sample evaluations (send us your part, see real results)
- Virtual or on-site consultations
Most inspections are completed in seconds to minutes, depending on part size and method. It’s definitely much faster than traditional techniques.
1. Discuss your application – Tell us what you need to inspect.
2. Sample evaluation – We test your parts to ensure a great fit.
3. Get a recommendation and quote – Customized for your needs.
4. Delivery & training – We build, ship, and train your team.
No formal certification needed. We provide comprehensive training, and our systems are designed to be easy to use—even for new operators.
Every system includes:
- In-depth training (on-site or virtual)
- Ongoing technical support by phone, email, or remote session
- Software updates and user resources
IR NDT may be less effective for:
- Very thick or highly reflective materials
- Deep defects in metals (limitations on penetration depth)
- Small or tight areas with restricted access
We’ll help you evaluate whether IR NDT is right for your application.
Absolutely. We routinely handle sensitive projects and are happy to sign an NDA before you share details or send samples.
Get Started with Thermography NDT
Have questions? Ready to bring inspections in-house? Let’s talk.

