Machine Vision Trends (2 / 2)
January 1, 2016 | Markus Tarin | Quality Magazine
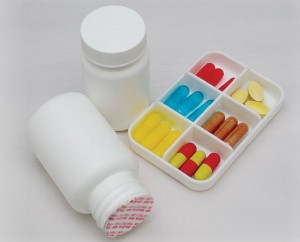 Packaging is all around us, whether you wander through the aisles of a grocery store, pick up your daily vitamins or prescription drugs, unwrap your new consumer electronics under the Christmas tree or find yourself in the emergency room after an accident. Everything comes in its own special purpose, carefully designed package. Packaging materials and techniques vary from recycled cardboard, paper, glass and plastics to special metalized films serving as freshness seals or as sterile barriers for medical devices or pharmaceuticals. Companies have entire engineering departments tasked with figuring out the most economical and functional way to package their goods. They also have to work hand in hand with the marketing department to assure that their packaging and print communicates the desired message to the consumer and contains the required labels, such as active and passive ingredients, calories, product weight, etc.
Another major challenge in this design process however is the design for manufacturability. Because in the end, a packaging machine needs to be able to wrap the products into their designated package. Most packages are being assembled during this process and many of them need to be sealed to avoid leaks, ingress of contaminants and to make sure the quality of the product is being maintained on the long journey through distribution, arriving on the shelves and finally getting to the consumer. Most package designers are not so much concerned with how a package can or will be inspected to assure that the packaging process is performing as it should. This is often assumed to be the responsibility of the packaging machine designer.
A critical part of many packages is the integrity of the seal. Since no process is perfect, this needs to be inspected or tested in order to avoid messy leaks, costly product returns, damage to the perceived quality of the brand or even litigation. Packaging lines typically run at a fairly fast pace, making traditional leak testing methods, such as a vacuum or pressure decay testing, too slow and impractical. Visual inspection using traditional machine vision with 2D cameras often hit their limits. The type of defects of concern may be hidden from plain view. Many package seals are being formed by applying or melting adhesives or by melting the packaging material together using conduction or induction heating methods or an ultrasonic welding method.
Potential failure methods include, but are not limited to the following:
- Part in seal
Usually, material that is supposed to be kept inside the package and away from the sealing area protrudes partially into the seal. This can cause an improper seal and/or damage to the product. - Leakers
Air bubbles or other incompletely sealed areas allow the product to leak out of the package. This could also allow contaminants to enter the product. - Weak Seal
Changes in the sealing process parameters may cause a weaker than normal seal. These seals may be complete, however, if the package is being exposed to stress, the seal may break. - Overheated Seal
The root causes are typically process parameters that were allowed to deviate too far beyond their “good range.” Overheating the seal area can lead to the seal becoming stiff or brittle. Even if the seal isn’t leaking after it leaves the production line, it may break when the package is being flexed or put under pressure.
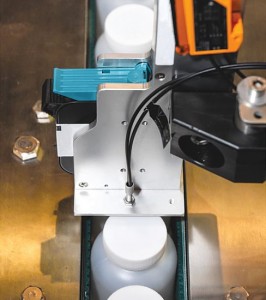 For thermally sealed package, there is an opportunity to inspect this process with a thermal camera. Depending on the overall package and seal design, this is not always a success guarantee, but it is definitely worth considering. A thermal camera is very well suited to measure and record sealing process parameters, even if this is an indirect method. For instance, for a conduction heat sealing process, commonly found on packaging machines, a thermal camera can provide valuable clues about the condition of the heat platen. Heat platen are being pressed against the seal with a selected pressure. Commonly, there is an array of packages that is being sealed in one process step. This makes the heating plate large. It also makes it mechanically more challenging to apply an even pressure across all seals. This in turn can lead to uneven heating of some parts of the seals. Since there are typically no pressure sensors to tell otherwise, this can go entirely unnoticed, until it reaches a critical level where a lot of seals are starting to fail. The issue is that hundreds or thousands of packages by now have left the production line with weak seals and may be out for delivery, thus creating a significant liability for the manufacturer. A properly designed thermal inspection system would have been able to detect this trend early on and alerted the operator. Pressure is only one of many variables that need to be tightly controlled. Often the packaging material starts to rub off and accumulate on the heating surfaces also leading to disturbances in the heat transfer. The sealing setup has some thermocouples built in to provide some sort of feedback. However, this method does not tell the whole story. It can merely detect whether the heating elements are functional and whether the set temperature is being maintained. It does not however, report any verifiable metrics about the seal integrity, directly.
When installing a thermal inspection system on a line it is always an eye opening experience for the operator of the machine. Never before were they able to intuitively grasp the heat distribution across the sealing area. More often than not was the assumption set forward, that process parameters are being controlled much more tightly than they actually are. Sometimes this gained insight is a reality check that is being met with denial and disbelief. “This can’t be!” “There must be something wrong with the inspection system!” are two phrases that are all too familiar. After the initial shock wears off, the “aha moment” kicks in. Correlations are forming between past incidences of failure modes and how these would probably manifest in a thermal image of the sealed region. However, the full benefit of a thermal imaging system (or any other inspection system for that matter), can really only be realized if the information is being used to improve the process. Only process improvement with the help of the gained insights will then lead to the desired return on investment (ROI) of the imaging system. This is an important lesson to understand. The ROI calculation needs to not only include the expense for the imaging system, but also needs to allow for process improvements. Granted, this is somewhat challenging to estimate, since it isn’t always known in advance what this might entail.
Examples of thermal Seal Inspections
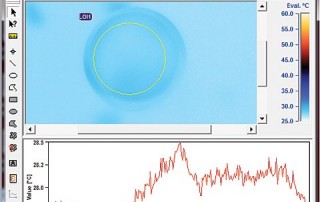
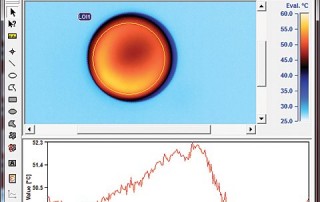
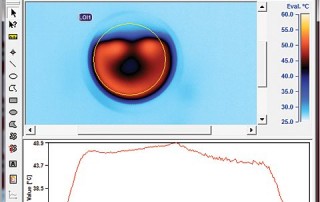
The following screenshots are taking from a thermal inspection of an induction heated aluminum foil of vitamin bottles. The thermal image has been artificially colorized after the fact. The orange area indicates the heat flow from the induction heated aluminum foil into the plastic, screw-on lid of the bottle. The aluminum foil is coated in a heat activated adhesive and is screwed onto the bottle together with the cap. An induction heater then creates eddy currents in the aluminum foil, causing it to heat up by magnetic induction. The example below shows partial adhesion and a resulting defective seal.
Look at the examples above. One example shows a completely missing foil. There is no heat signature. The total temperature variation is only about one degree Celsius over the entire seal perimeter.
There is also an example of a good seal. The temperature distribution is rather uniform and of the expected magnitude.
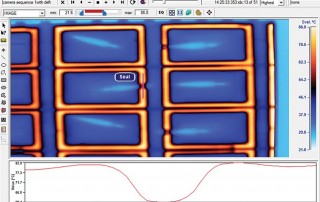
The third image shows multiple packages being sealed simultaneously. There is a part in the seal, causing a leak. The purple line is to demonstrate the temperature variation across that defect. Some pass/fail criteria can be derived from understanding statistical readings from known good seals and comparing these to known bad areas or defects. The rectangular and orange regions are representing the actual package seal. The blue area inside the rectangle represents the part content. The lighter blue area is a plastic component inside the package. Several packages have a sealing defect.
There are other factors to consider when selecting a thermal inspection method. For instance, is the production line indexed or continuous? If the parts are not indexed, motion blur may occur depending on how fast the line moves. This can be mitigated by using a faster thermal camera. Another important factor which needs to be examined is where to place the thermal camera with respect to the sealing process. If it is a bottling line, this may depend on how fast the heat propagates from the aluminum seal through the plastic cap. The design of the cap, especially its thickness may require the camera to be mounted further down the line to allow enough time for the heat to emerge on the surface of the cap. If the seal is exposed and the material is very thin and therefore cools quickly, then the camera needs to be mounted as close as possible to the sealing station. In any case, it is advisable to work closely together with an integrator or manufacturer of this sort of equipment, when it comes to implement a thermal imaging solution.

